Description:
The Fuel Door Valet™ module provides remote controlled fuel door release from the
stock remote key FOB for the 1997-2004 Corvette, while still allowing normal use of
the standard release button and emergency pull cord.
Background:
The C5 has an electric release for the fuel door. The release button is located
inside the center console; easy enough to access unless the driver is outside the
car or the console is kept locked. Reaching inside the car to activate the release
is difficult from outside the car as the console is low and opens away from the
driver's side. By providing access via remote control, the Fuel Door Valet™
allows the driver to access the fuel tank by simply clicking a special lock-unlock
sequence on the stock remote. There's never a need to get back into the car or to
unlock the center console when refueling.
Usage:
To release the fuel door via the remote key fob, simply press lock, unlock, and
unlock again, all in rapid succession. If there is more than a one second pause
between two key presses, the sequence must be repeated in order to trigger the
fuel door's release.
Installation:
[tools: 10mm socket, needle nose pliers, flathead, (T15 torx for convertibles)]
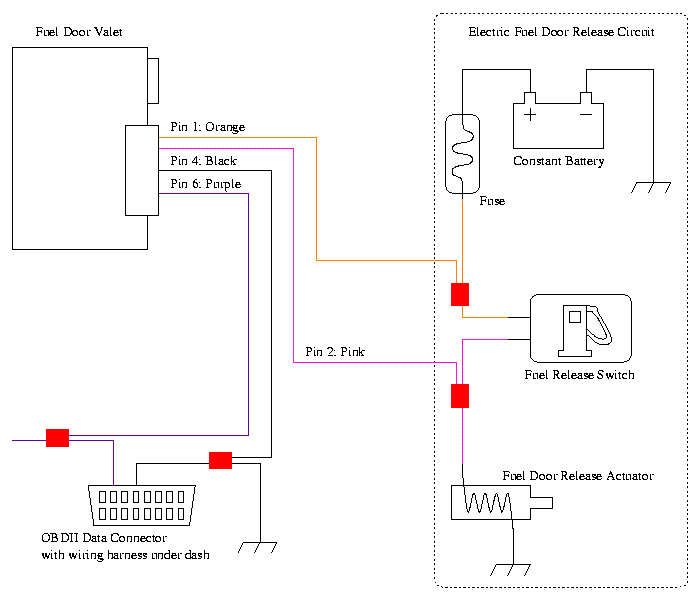
The Fuel Door Valet™ connects to the fuel door release switch leads under the
trim inside the center console area. It also requires a ground connection and
a connection to the OBDII serial data line. All safety precautions for automotive
electrical wiring should be followed. If you do not have electrical wiring
experience, any qualified stereo or alarm installation facility should be able to
install the module for you. Please read the "Terms of Use, Warranty, and
Liability Waiver" before proceeding to the installation directions.
Be sure that the battery is disconnected before attempting to wire any new
accessories. An inadvertent short could blow a fuse or cause extreme heating
or melting of metal tools. This can be very dangerous. A ring or loose jewelry
could short and melt causing severe burns.
The Fuel Door Valet™ requires a constant +12V supply. Be sure this line
is properly fused. (The orange wire at the Fuel Door Release Switch in the C5 meets
this requirement perfectly.) The pre-installed fuse inside the Fuel Door
Valet™ only protects the Fuel Door Valet™ and its fuel release actuator
output from shorts, so the main supply line still needs its own fuse.
Be sure that all new wiring is routed to avoid any moving parts, such as gear
shifters and foot pedals, where repetitive motion or vibration can wear wiring
and cause electrical damage or interfere with driver safety.
Wiretaps are supplied to make connecting the Fuel Door Valet™ quick and easy.
These connectors are made by 3M and are UL listed. They can be slipped around
an existing wire without having to cut or splice into it. The side is folded
up and snapped closed to hold the main wire in place. The new connection is
made by sliding the end of an unstripped wire fully into the remaining port and
pressing the metal clip with a pair of pliers until the clip is flush with the
plastic body. The lid snaps closed to insulate the connection.
Recommended procedure for installation in a C5:
Step 0: (convertibles only)
For convertible C5's, the "waterfall" must be
removed to gain access to the center console area. Let the top down and leave
the deck lid up. Begin by removing the four T15 torque-head screws (two per side),
and then slide the painted body panel up and off the convertible latching hardware.
Set this piece safely aside. |
 |
Step 1:
Disconnect power and proceed with caution. Open the center console
storage lid. Then, pop out the center console control panel very carefully.
The service manuals suggest using a flat screwdriver with a protective cloth
to prevent damage to the console panel's finish. Alternately, it can be done
bare handed with a careful, strong grip by prying upward on the edges that are
towards the console storage area. |
 |
 |
Then remove the cable connector to free the
console panel and set the panel safely aside. Also disconnect the storage area's
accessory power connector. Note that each connector has a locking tab.
|
Step 2:
Remove the two fastener covers at the rear of the storage area. The
covers can be removed by hand or by using a small flathead screwdriver for leverage.
Remove the two exposed 10mm nuts with a socket wrench. Then remove the other
two nuts that were revealed when the console control panel was removed. Lift
the rear of the console just enough to clear the bolts and slide the panel rearward
until it clears the front of the console area. |
 |
 |
Lift the whole assembly up and
reach underneath and inside the fuel switch area and disconnect the connector
(this connector also has a locking tab) from the switch housing. Lift the entire
console out and set it aside. A second person may make an easier job of
disconnecting the fuel release switch cable. |
Step 3:
With the center console storage area out of the way, the Fuel Door
Valet™ can be easily wired into the fuel release switch's cable. Slide the
orange and pink wires from the Fuel Door Valet™'s wiring harness kit underneath
the trim on the driver's side near the center console panel area (following the
vertical yellow arrow in the picture). Run the two wires between the support
members, across the open area and in between the two support members on the
passenger side, and then route rearward towards the fuel door switch connector.
Using one 3M wire tap, connect the pink wire to the pink wire of the fuel door
switch cable, and then with a second 3M wiretap, connect the orange wire to the
orange wire of the fuel door switch cable. |
 |
Step 4:
There are two plastic fasteners that hold the OBDII connector in place.
These fasteners can be pried outwards with a flathead screwdriver and then
pulled straight out with a small set of needle nose pliers. These are "ridged"
plastic and can be stripped out of the holes and then reused. Once the fasteners
are out, the OBDII connector's wires can be pulled to get just a little slack
from the wiring harness feeding the connector. |
 |
Step 5:
Attach the purple Fuel Door Valet™ wire (pin 6) to the purple wire
(pin 2) of the OBDII connector. Be sure to attach the wires as far away from
the connector as possible so that the wiretaps can be manipulated to make room
for the connector to go back into it's original place. Also connect the black
wire (pin 4) of the Fuel Door Valet™ harness to the black wire (also pin 4) of
the OBDII connector, again making room to manipulate the completed connections.
If the wiretaps are very close to the connector, the connector may have difficulty
sitting flush again, unless both wiretaps are laid perfectly flat. Give yourself
more room than the photo. |
 |
** (You may skip to Step 10 to test the circuitry before reassembly, but be
sure to disconnect the battery again before continuing on to Step 6.)
Step 6:
Place the wiretaps adjacent to each other and flat against the OBDII
connector and hold the connector snuggly in place. Push the plastic fasteners
back into place as tightly as they'll go. The connector should fit as snug and
flush as before.
Step 7:
Replace the center console and be sure to reconnect the fuel door switch
cable. Slide the console forward until it's flush in it's old location, but be
sure to hold the rear upward until it clears the connector bolts. Once in place,
secure and tighten all four nuts and cover the rear two with their lids. Reattach
the accessory power connector.
Step 8:
Take the center console control panel and attach it's connector cable,
then snap the panel carefully back into place.
Step 9: (convertibles only)
Carefully slide the waterfall back over the top
release hardware. Align the panel so that all four torque screws can be reinserted.
Reinstall, but do not over tighten.
Step 10:
Reconnect the battery and test the circuitry before continuing. Be
sure that the car's remote lock and unlock buttons still work. If the key FOB
is no longer in sync with the vehicle because of the loss of power, press and
hold the lock and unlock buttons together on the FOB for more than 10 seconds
or until the horn blows. This will usually restore FOB synchronization. If it
does not, please see your car's owner's manual for reprogramming a key FOB. Then,
to test the Fuel Door Valet™, simply press lock, unlock, and unlock in rapid
succession (with less than one second between subsequent presses). The fuel door
should pop open. Also check that the manual fuel door release button inside the
center console still operates properly, if the center console is back in place.
Step 11:
The final step is to securely mount the Fuel Door Valet™ so it does
not fall or rattle. This can be done with the double-sided sticky foam. Simply
slide the unit up inside the trim as shown and find a place it easily fits, noting
the orientation and routing of the cables, then remove the backing from the foam
tape, and reinstall. There is a support "boss" underneath the trim. An easy
fit is just along its edge and toward the front of the car. Make sure the fit
is fairly flat and that there is not a lot of tension in the wiring. Enjoy! |
 |
|
|


